This website is operated by C&A Supply Co. Ltd - an authorised distributor of
Brother home sewing machines, not part of the Brother Group.

Fixing common sewing machine problems:
Tuesday, January 16, 2018
"Help my sewing machine will not sew....what have I done wrong?"
Fixing common sewing machine problems:
Your Sewing machine manual.
Should you encounter a problem with your sewing machine, it's best to refer to the instruction manual supplied with your machine. This will contain details of the correct settings for your machine and may contain a trouble shooting guide.
1. Machine not sewing
Refer to your instruction manual for general set up of your machine.
Some common points to check are:
- Check that the bobbin winder shaft is not pushed to the right if it is then push it to the left.
- Check that your machine is threaded correctly ensuring the threading line on the hand wheel is at the top position, this will put the needle into the correct position for threading. Also, make sure the presser foot is lifted before threading the machine.
- Set your bobbin correctly into the machine. For top loading bobbins the thread needs to be going around the bobbin in an anti-clockwise direction. Use the guides on your machine or refer to your instruction manual.
If you have a mechanical machine, check that the foot is lowered before sewing. Some Computerized machines will remind you to do this.
2. Thread bunching or "Bird nesting " of thread under the fabric.
There are many causes for this but fortunately some simple steps can help solve this problem.
- Re-thread the top thread ensuring the threading line indicator on the hand wheel is positioned to the top (this puts the thread take up lever in the correct position for threading.) Missing the take up lever will cause thread to gather under the material.
- Re-thread the top thread, with your presser foot raised. (Threading your machine with the foot down will result in no tension being applied to the top thread because the tension discs are closed.)
- Check the position of your bobbin case and reset as per instruction manual.
- Check the tension settings, if the setting is too low reset the tension to setting number 4.
3. Thread breaking
- Re-thread the top thread ensuring the threading line indicator on the hand wheel is positioned to the top (this puts the thread take up lever at the correct position for threading.)
- Use a good quality thread. It's common for inexpensive low-quality threads or threads designed for hand sewing to be the cause of what appears to be tension problems when there is nothing wrong with the machine. For best results use a good quality branded thread.
- To check if your thread is suitable for use on a sewing machine.
- Thread your machine with the foot raised. The thread should pull through the machine with no tightness. Using thread that does not pull through smoothly can cause thread breakages, poor stitching or damage to your machine.
4. Bobbin
Your brother sewing machine is made to use a bobbin specifically designed to give the best stitching results. It's important to use only original Brother Bobbins of the correct size for your machine. All modern top loading Brother sewing machines will use an 11.5 mm bobbin (SFB), while some older models will use a 9.2mm bobbin (TLB). Check your machine manual for the correct size.
Using 3rd party bobbins may result in poor stitch quality or even damage your machine.
Metal bobbins must NEVER be used with a Brother sewing machine equipped with a Top loading or Quick Set bobbin system.
Make sure the thread is wound onto your bobbin evenly. When winding thread onto your bobbin the thread needs to go right underneath the tension disc on the top of the machine. Follow the guide on your machine or the instructions in your manual.
Set your bobbin correctly into the machine. For top loading bobbins the thread needs to be going around the bobbin in an anti-clockwise direction. Use the guides on your machine for help or refer to your instruction manual.
5. Fabric not feeding.
If your machine has drop feed, check that the feed has not been accidentally lowered. If they have, raise the feed to ensure the fabric will move forward.
If you have a mechanical machine, check that the foot is lowered before sewing. Some Computerised machines may remind you to do this.
Check the stitch length on your machine. If it is too low the machine might not feed through enough.
6. Needle.
The sewing machine needle is probably the most important part of the sewing machine. Choosing the proper needle for your sewing project will result in a beautiful finish and fewer problems.
Below are some things to keep in mind about needles.
- The smaller the needle number, the finer the needle. As the numbers increase, the needles get thicker.
- Use fine needles with lightweight fabrics, and thicker needles with heavyweight fabrics.
- To avoid skipped stitches use ball point needle 90/14 with stretch fabrics.
- To avoid skipped stitches use ball point needle 90/14 when sewing character or decorative stitches.
- Use needle 75/11 for embroidery.
- It is recommended that a 90/14 needle should be used when embroidering on heavyweight fabrics or stabilizing products (for example denim, puffy foam, etc.). A 75/11 needle may bend or break which could result in injury.
- Ball point needles 90/14 are not recommended for embroidery as they may bend or break, causing injury.
Sewing with a bent needle can be extremely dangerous since the needle may break while the machine is being operated.
Before using the needle, place the flat side of the needle on a flat surface and check that the distance between the needle and the flat surface is even.

(1) Flat side
(2) Needle type marking
Correct needle
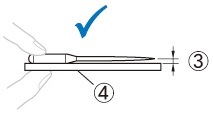
(3) Parallel space
(4) Flat surface
Incorrect needle

If the distance between the needle and the flat surface is not even, the needle is bent.
Do not use a bent needle.
(5) Flat surface
Fabric / Thread / Needle Combinations
The sewing machine needle that should be used depends on the fabric and thread thickness.
Refer to the following table when choosing the thread and needle appropriate for the fabric you wish to sew.
|
Fabric Type/Application |
Thread |
Size of Needle |
||
|
Type |
Size |
|||
|
Medium weight fabrics |
Broadcloth |
Cotton thread |
60 – 90 |
75/11 – 90/14 |
|
Taffeta |
Synthetic thread |
|||
|
Flannel, |
Silk thread |
50 |
||
|
Thin fabrics |
Lawn |
Cotton thread |
60 – 90 |
65/9 – 75/11 |
|
Georgette |
Synthetic thread |
|||
|
Challis, |
Silk thread |
50 |
||
|
Thick fabrics |
Denim |
Cotton thread |
30 |
100/16 |
|
50 |
90/14 – 100/16 |
|||
|
Corduroy |
Synthetic thread |
50 – 60 |
||
|
Tweed |
Silk thread |
|||
|
Stretch fabrics |
Jersey |
Thread for knits |
50 – 60 |
Ball point needle |
|
Tricot |
||||
|
Easily frayed fabrics |
Cotton thread |
50 – 90 |
65/9 – 90/14 |
|
|
Synthetic thread |
||||
|
Silk thread |
50 |
|||
|
For top-stitching |
Synthetic thread, |
30 |
100/16 |
|
|
50 – 60 |
75/11 – 90/14 |
|||
Note: Never use a thread of weight 20 or lower. It may cause malfunctions.
7. Need more help?
Call us on 01483 267777 or email info@brothermachines.com